

Member Profiles
Member profiles are the heart of your BuddyPress community. BuddyX Pro transforms standard BuddyPress profiles into beautiful, feature-rich pages that showcase your members’ information, activity, and achievements.
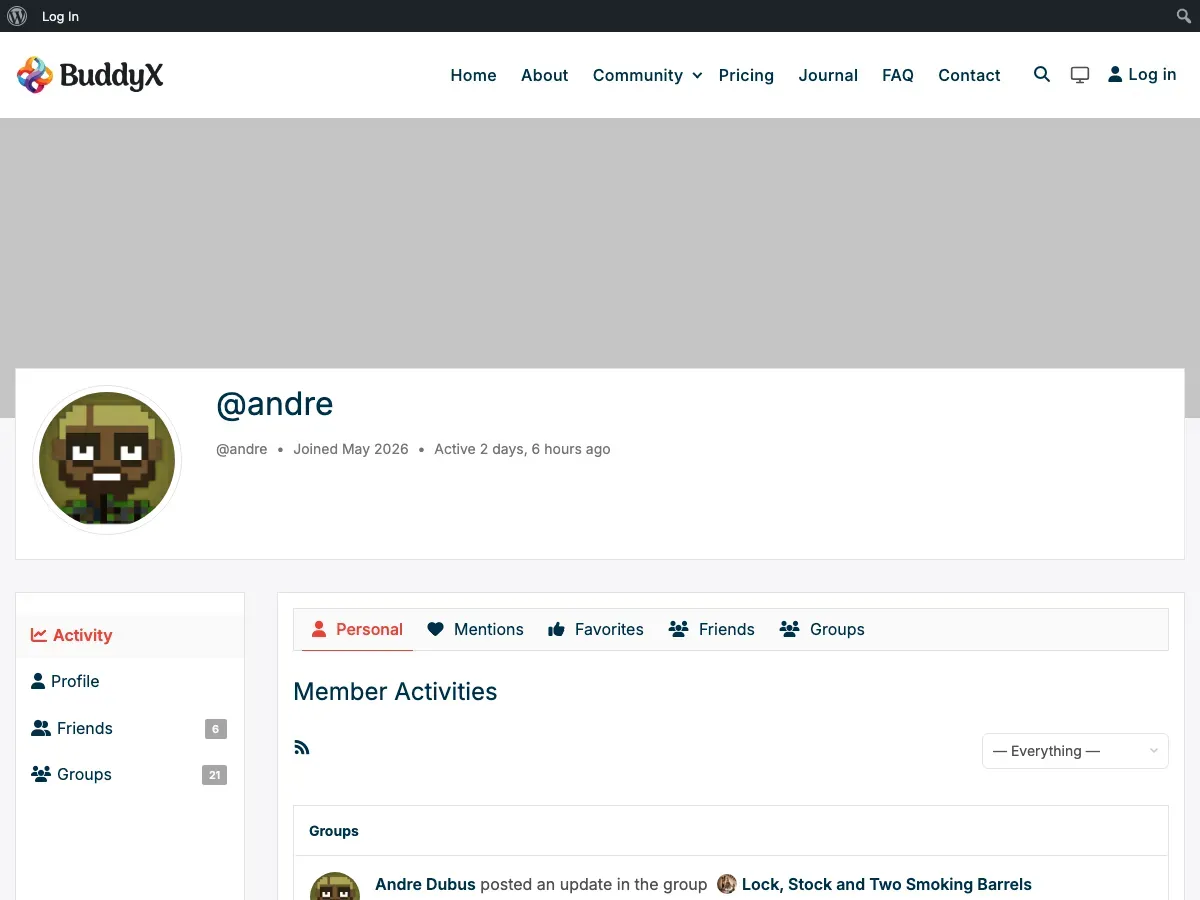
Where these settings live: Single-member profile controls are in Customizer > Community Settings > Single Member. Default cover images are set under Customizer > Community Settings > Members Directory.
Youzify note: The Community Settings panel (including every profile control below) is removed when the Youzify plugin is active - Youzify manages its own profile screens. Run BuddyPress without Youzify to use these options.
What Makes BuddyX Pro Profiles Special
Section titled “What Makes BuddyX Pro Profiles Special”BuddyX Pro enhances BuddyPress member profiles with:
- 6 Header Layout Styles - From classic to modern designs
- 3 Navigation Styles - Optimized for desktop and mobile
- Cover Images - Visual profile headers with drag-drop upload
- Online Status Indicators - Real-time online/offline display
- Social Links Integration - Connect member social media profiles
- Follower Counts - Display followers and following (with BP Follow)
- Member Type Badges - Visual indicators for member roles
- Achievement Badges - BadgeOS integration support
- Profile Visitor Counter - Track profile views (with plugin)
Profile Header Layouts
Section titled “Profile Header Layouts”Choose the layout that matches your community’s style.
Layout 1: Left View (Default)
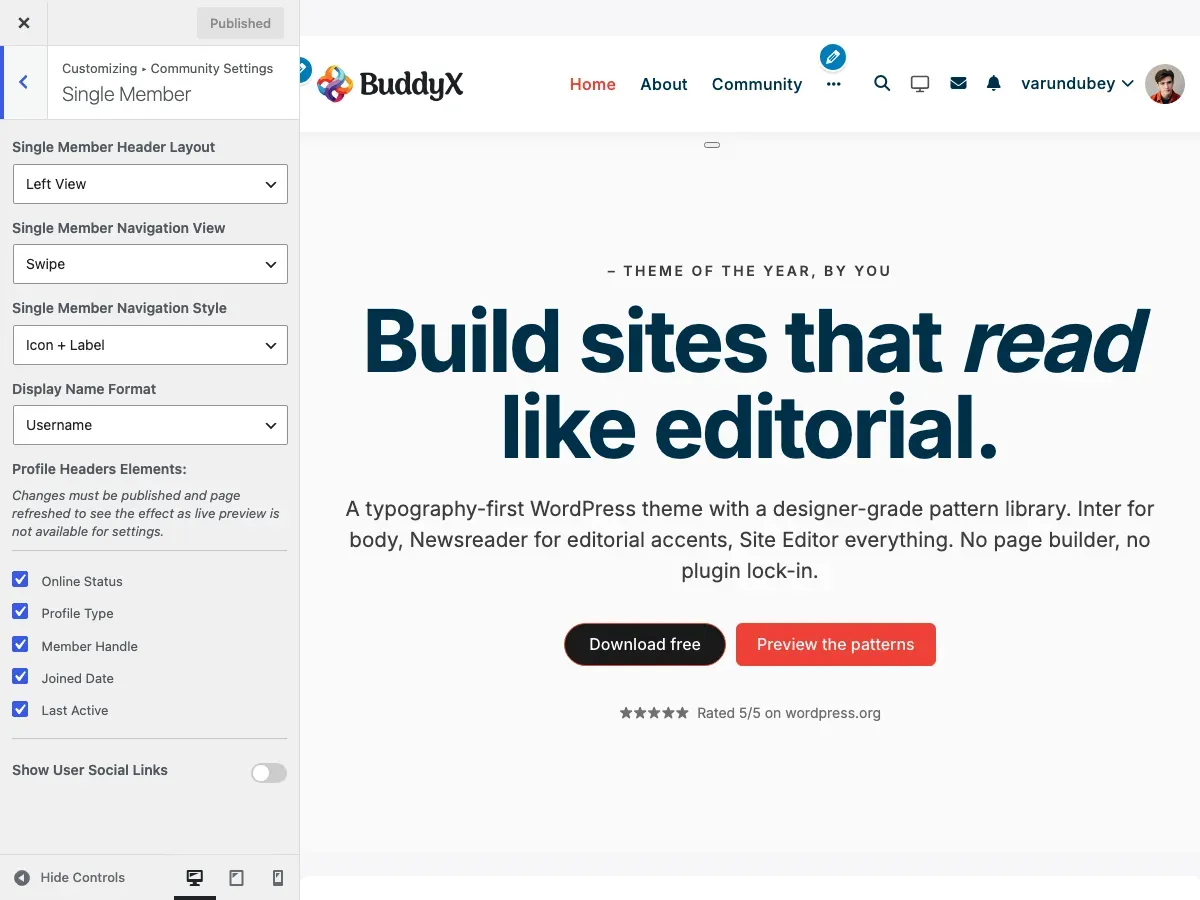
Section titled “Layout 1: Left View (Default)”Best For: Traditional social networks, general communities
Layout:
- Avatar positioned on the left
- Member info and stats on the right
- Full-width background
- Horizontal navigation below header
When to Use:
- Facebook-style communities
- General purpose social networks
- Communities prioritizing information density
Layout 2: Centered View
Section titled “Layout 2: Centered View”
Best For: Modern, visual communities
Layout:
- Avatar centered at top
- Member info centered below avatar
- Symmetrical design
- Navigation tabs centered
When to Use:
- Portfolio communities
- Creative professional networks
- Image-focused communities
Layout 3: Container Left View
Section titled “Layout 3: Container Left View”
Best For: Boxed website layouts
Layout:
- Left-aligned like Layout 1
- Contained within site’s content width
- Better integration with boxed themes
When to Use:
- Sites with boxed/contained layouts
- Corporate community sites
- Learning management communities
Layout 4: Container Centered View
Section titled “Layout 4: Container Centered View”
Best For: Professional networks with contained layouts
Layout:
- Centered like Layout 2
- Contained within content width
- Professional, organized appearance
When to Use:
- Business directories
- Professional associations
- B2B communities
Layout 5: Stretch Left View
Section titled “Layout 5: Stretch Left View”
Best For: Magazine-style sites
Layout:
- Left-aligned layout
- Extends full browser width
- Maximum visual impact
When to Use:
- Media-rich communities
- Magazine-style sites
- Communities with large cover images
Layout 6: Stretch Centered View
Section titled “Layout 6: Stretch Centered View”
Best For: Portfolio and creative communities
Layout:
- Centered layout
- Full browser width
- Maximum impact for cover images
When to Use:
- Artist communities
- Photography networks
- Design portfolios
How to Change Header Layout
Section titled “How to Change Header Layout”- Go to Appearance > Customize
- Navigate to Community Settings > Single Member
- Find Single Member Header Layout
- Select your preferred layout
- Click Publish
- Visit a member profile to see the change
Recommended Layout
Section titled “Recommended Layout”Left View is recommended for most communities because:
- Familiar layout - Users expect avatar on left, info on right (like Facebook, LinkedIn)
- Easy scanning - Eye naturally flows left to right
- Action buttons accessible - Prominent placement for Add Friend, Send Message
- Works at all screen sizes - Responsive without awkward reflows
- Professional appearance - Clean, traditional social network feel
Use centered or stretch layouts only if your design specifically calls for it (portfolios, creative communities, magazine-style sites).
Profile Navigation
Section titled “Profile Navigation”Control how navigation tabs appear on member profiles.
Navigation View Options
Section titled “Navigation View Options”More (Dropdown)
How It Works:
- Primary tabs visible
- Extra tabs in “More” dropdown
- Saves vertical space
Best For:
- Desktop-focused communities
- Sites with many profile sections
- Traditional forum-style layouts
Swipe (Horizontal Scroll)
How It Works:
- All tabs in horizontal row
- Swipe/scroll to see more tabs
- Touch-friendly
Best For:
- Mobile-first communities
- Modern, app-like experiences
- Communities with 4-8 profile sections
Navigation Style Options
Section titled “Navigation Style Options”Default (Text Only)
- Tab labels without icons
- Clean, minimal look
- Fastest loading
Icon + Label
- Icons with text labels
- Easy visual recognition
- Modern appearance
Icon + Label (Swipe 1)
- Compact icons for swipe navigation
- Optimized for horizontal scrolling
- Space-efficient
Icon + Label (Swipe 2)
- Larger icons for swipe navigation
- Better visibility on mobile
- Touch-friendly targets
How to Change Navigation
Section titled “How to Change Navigation”- Customizer > Community Settings > Single Member
- Single Member Navigation View: Choose More or Swipe
- Single Member Navigation Style: Choose icon style
- Click Publish
Cover Images
Section titled “Cover Images”Cover images add visual appeal to member profiles.
Cover Image Features
Section titled “Cover Image Features”- Drag-and-drop upload - Easy image updates
- Default images - Set fallback for members without covers
- Responsive design - Looks great on all devices
- Activity feed updates - Shows when cover changes (optional)
Setting Up Default Cover Images
Section titled “Setting Up Default Cover Images”- Customizer > Community Settings > Members Directory
- Enable Customize Members Cover Background
- Click Set Default Cover Image
- Upload your image
- Click Publish
BuddyBoss note: The Customize Members Cover Background switch and Set Default Cover Image upload appear only on a BuddyPress (non-BuddyBoss) site. When BuddyBoss Platform is active, BuddyBoss manages cover images and the theme hides these controls.
Recommended Dimensions: 1300px x 225px
Image Tips:
- Use WebP format for smaller file size
- Keep file size under 200KB
- Use subtle patterns or gradients
- Avoid text in images (accessibility)
- Test on mobile devices
Member Upload Process
Section titled “Member Upload Process”Members can upload their own cover images:
- Visit own profile
- Click Change Cover Image button (on cover area)
- Drag and drop image or click to browse
- Crop if needed
- Click Upload
Member Upload Requirements:
- BuddyPress must allow cover image uploads
- Member must be logged in
- Viewing own profile
Profile Information Display
Section titled “Profile Information Display”Control what information appears in profile headers.
Available Elements
Section titled “Available Elements”| Element | What It Shows | When to Show | When to Hide |
|---|---|---|---|
| Online Status | Green/gray indicator | Real-time communities | Privacy-focused sites |
| Profile Type | Member type badge | Multiple member types | Single member type |
| Member Handle | @username | Twitter-like communities | Formal professional networks |
| Joined Date | Registration date | Growth-focused communities | Privacy-focused sites |
| Last Active | Recent activity timestamp | Active engagement sites | Privacy concerns |
| Followers | Follower count | Social networks | Private communities |
| Following | Following count | Social networks | Simple communities |
How to Configure Elements
Section titled “How to Configure Elements”- Customizer > Community Settings > Single Member
- Scroll to Profile Headers Elements
- Check/uncheck desired elements
- Click Publish
- Refresh a profile page to see changes
Note: Changes require page refresh; live preview is not available.
Online Status Indicators
Section titled “Online Status Indicators”Show members who’s currently active in your community.
How It Works
Section titled “How It Works”- Green dot - Member active in last 5 minutes
- Gray dot - Member offline or inactive
- Updates automatically - Checks every 5 minutes
- Cached for performance - Reduces database load
Where It Appears
Section titled “Where It Appears”- Profile header
- Member directory cards
- Activity stream avatars
- Group member lists
Privacy Considerations
Section titled “Privacy Considerations”Some communities prefer to hide online status:
Hide For:
- Mental health communities
- Private support groups
- Professional networks where privacy matters
- High-profile member communities
Show For:
- Social networks
- Gaming communities
- Real-time collaboration sites
- Dating/matchmaking communities
How to Disable:
- Customizer > Community Settings > Single Member
- Uncheck Online Status
- Customizer > Community Settings > Members Directory
- Uncheck Online Status in directory settings
- Publish
Social Links Integration
Section titled “Social Links Integration”Let members showcase their social media profiles.
How to Enable
Section titled “How to Enable”- Customizer > Community Settings > Single Member
- Enable Show User Social Links
- Configure User Social Links section
- Add desired social networks
- Publish
Default Social Networks
Section titled “Default Social Networks”Adding Custom Social Networks
Section titled “Adding Custom Social Networks”- Click Add button in User Social Links
- Title: Network name (e.g., “TikTok”)
- Icon: FontAwesome code:
<i class="fa-brands fa-tiktok"></i> - Icon Color: Choose brand color
- Click Publish
Finding FontAwesome Icons:
- Visit fontawesome.com/search
- Search for social network
- Click icon
- Copy HTML code
- Paste into Icon field
Member Setup Process
Section titled “Member Setup Process”Once enabled, members add links in their profile:
- Go to profile Edit page
- Scroll to Social Links section
- Enter social media URLs
- Click Save Changes
Links appear:
- In profile header
- As clickable icons
- With hover tooltips
- In customizable colors
Display Name Format
Section titled “Display Name Format”BuddyPress Only (not BuddyBoss)
Choose how member names appear throughout the site.
Username Format
Section titled “Username Format”Shows: WordPress username (e.g., johndoe123)
Best For:
- Twitter-like communities
- Gaming communities
- Anonymous communities
Display Name Format
Section titled “Display Name Format”Shows: User’s display name (e.g., John Doe)
Best For:
- Professional networks
- Real-name communities
- Formal organizations
How to Change:
- Customizer > Community Settings > Single Member
- Display Name Format: Choose Username or Display Name
- Publish
Follower and Following Counts
Section titled “Follower and Following Counts”Requires: BP Follow plugin or BuddyBoss Platform
Display social connections on member profiles.
What’s Included
Section titled “What’s Included”- Follower count - Number following this member
- Following count - Number this member follows
- Clickable links - View full follower/following lists
- Directory display - Optional in member cards
Where It Appears
Section titled “Where It Appears”- Profile header meta section
- Member directory cards (optional)
- Activity stream
How to Enable
Section titled “How to Enable”Already enabled by default if you have:
- BP Follow plugin installed, OR
- BuddyBoss Platform active
To hide from directory:
- Customizer > Community Settings > Members Directory
- Uncheck Followers in Member Directories Elements
- Publish
Member Type Badges
Section titled “Member Type Badges”Display visual badges for different member types.
What Are Member Types?
Section titled “What Are Member Types?”Member types let you categorize members:
- Students vs Teachers
- Free vs Premium members
- Customers vs Staff
- Regular vs VIP members
Setting Up Member Types
Section titled “Setting Up Member Types”Requires: BuddyPress Member Types feature or custom code
- Define member types in BuddyPress
- Assign types to members
- BuddyX Pro displays type badges automatically
Badge Display Options
Section titled “Badge Display Options”Show in:
- Profile header
- Member directory cards
- Activity stream
To hide:
- Customizer > Community Settings > Single Member
- Uncheck Profile Type
- Publish
Visitor Counter
Section titled “Visitor Counter”Requires: “Who Viewed My Profile” plugin
Track and display profile view counts.
What It Shows
Section titled “What It Shows”- Total unique visitors
- “Visitor” or “Visitors” label
- Appears below profile header
How to Enable
Section titled “How to Enable”- Install “Who Viewed My Profile” plugin
- Activate plugin
- Counter appears automatically on profiles
- Members see who viewed their profile
Location: Displays in profile meta section, below member information.
Profile Achievements (BadgeOS)
Section titled “Profile Achievements (BadgeOS)”Requires: BadgeOS plugin
Showcase member achievements and badges.
What’s Displayed
Section titled “What’s Displayed”- Recently earned badges
- Badge images
- Up to 10 badges
- Links to individual badge pages
How It Works
Section titled “How It Works”- Install and configure BadgeOS
- Create achievement types and badges
- Members earn badges through activity
- Badges automatically display on profiles
Location: Appears in dedicated section on profile page.
Common Questions
Section titled “Common Questions”Q: Can members choose their own profile layout? A: No. Profile layouts are set site-wide by administrators. All members have the same layout.
Q: How do I disable cover images completely? A: Go to BuddyPress > Settings > Cover Images and disable cover image uploads.
Q: Will social links work if member leaves field empty? A: Yes. Only filled social links display. Empty fields are hidden automatically.
Q: Can I add more than 4 social networks? A: Yes. Click “Add” as many times as needed. There’s no limit.
Q: Do profile visitors see my online status? A: Yes, if online status is enabled. It updates every 5 minutes.
Q: How accurate is the online status indicator? A: Very accurate. It shows members active in the last 5 minutes. Cached for performance.
Q: Can I use different header layouts for different member types? A: Not through Customizer settings. You would need custom CSS or theme customization.
Q: What if a member doesn’t upload a cover image? A: They see the default cover image you set in Customizer, or BuddyPress default if none set.
Q: How do I remove the @username handle from profiles? A: Customizer > Community Settings > Single Member > Uncheck “Member Handle” > Publish.
Q: Can visitors see follower counts? A: Yes. Follower/following counts are public information visible to all visitors.
Recommended Configurations by Community Type
Section titled “Recommended Configurations by Community Type”Professional Network
Section titled “Professional Network”- Layout: Container Centered View
- Navigation: More (dropdown), Icon + Label
- Show: Profile Type, Member Handle, Followers, Following
- Hide: Last Active, Online Status (privacy)
- Social Links: Enabled with LinkedIn, Twitter
Casual Social Community
Section titled “Casual Social Community”- Layout: Left View
- Navigation: Swipe, Icon + Label
- Show: Online Status, Last Active, Followers
- Social Links: Enabled with Facebook, Instagram, Twitter
Learning Community
Section titled “Learning Community”- Layout: Container Left View
- Navigation: More (dropdown), Default style
- Show: Profile Type, Joined Date, Last Active
- Hide: Online Status
- Social Links: Optional
Private Support Group
Section titled “Private Support Group”- Layout: Centered View
- Navigation: Swipe, Default style
- Show: Profile Type, Joined Date
- Hide: Online Status, Last Active, Follower counts
- Social Links: Disabled
Related Settings
Section titled “Related Settings”- BuddyPress Customizer Settings - All customizer options
- Member Directory - Directory layouts and filters
- Activity Stream - Activity feed on profiles
- Groups - Member’s group involvement
Got a question? We’re a friendly team - happy to help.
- Visit our Documentation Portal
- Email us at support@wbcomdesigns.com
- View Video Tutorials