

Emails and Announcements
Emails and Announcements
Section titled “Emails and Announcements”Learnomy sends automated email notifications for key learning events and lets you broadcast one-off announcements to all students or to the students of a specific course.
Overview
Section titled “Overview”There are two distinct surfaces:
- Email Settings (at LMS Settings > Emails) controls which automated notifications go out, who they come from, and lets you customize each notification’s subject and body.
- Email Log (at LMS Settings > Email Log) is an audit trail of every notification that was dispatched, with filtering and a one-click resend.
- Announcements (at Learnomy > Announcements) lets you compose and send manual broadcasts to students.
Note: Announcements (Learnomy > Announcements) and the Email Log appear only when the Notifications module is enabled on the Modules page. If you don’t see them, turn that module on first.
Before you rely on email: check it actually sends
Section titled “Before you rely on email: check it actually sends”Do this first. Every notification below depends on WordPress being able to send mail at all, and out of the box on most hosts it cannot do so reliably.
WordPress sends through PHP’s mail() by default. Mail sent that way has no authentication behind it, so Gmail, Outlook and most business mail servers either drop it silently or file it as spam. Nothing in Learnomy or WordPress reports this: the Email Log will show the message as sent, because as far as WordPress is concerned it handed the message off successfully.
Install an SMTP plugin and point it at a real mailbox or a sending service before you tell students to expect email from your site. Any of the usual ones will do. Once it is configured:
- Go to LMS Settings > Settings > API and Performance and find the Tools card.
- Click Send Test Email. It dispatches a test notification to your admin email address.
- Check that it arrives, and check the spam folder if it does not.
If the test email does not arrive, no other setting on this page will help - fix the sending first.
Configuring Email Notifications
Section titled “Configuring Email Notifications”-
Go to LMS Settings in the sidebar.
-
Click Emails in the left-hand settings navigation.
-
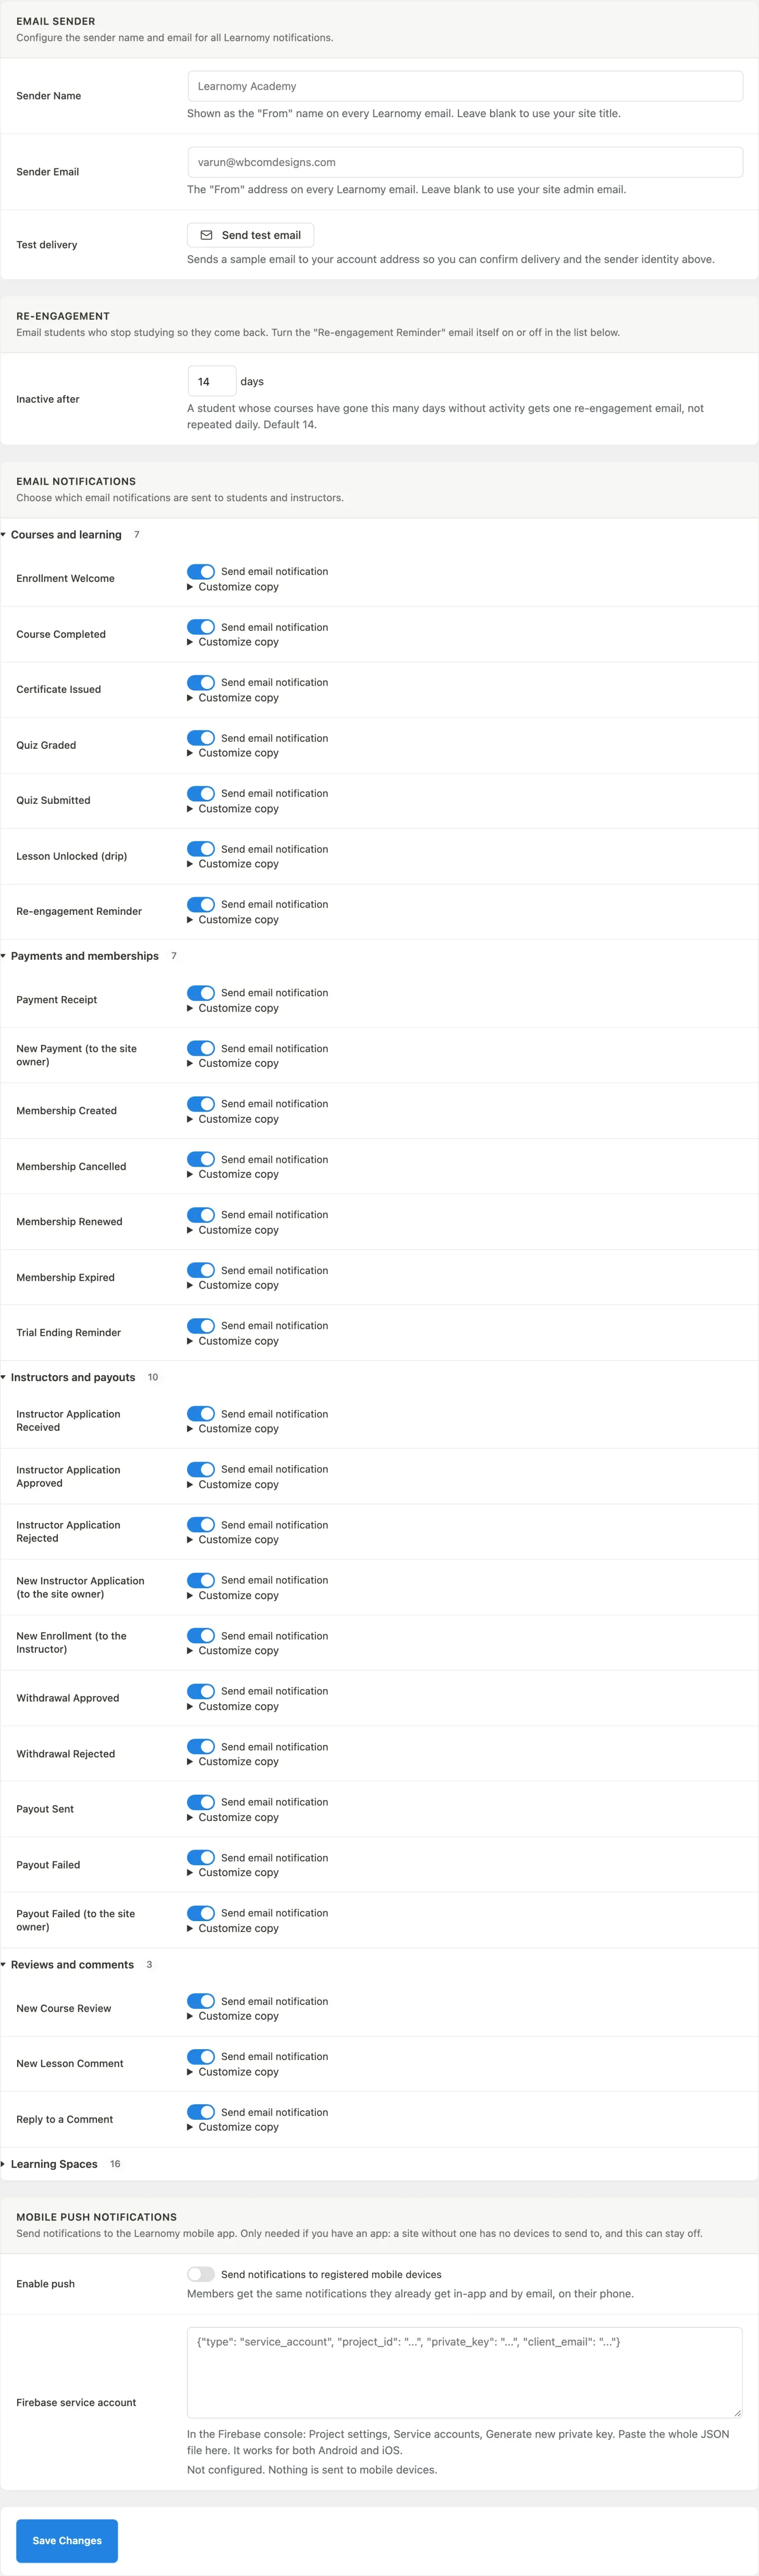
Under Email Sender, enter the name and email address you want recipients to see. By default these use your site name and admin email.
-
Under Email Notifications, use the toggle next to each notification to turn it on or off.
Every email Learnomy sends through its own notification service has a row here. Learning Spaces (Pro) sends some of its member emails directly and those have no row, so they cannot be switched off from this screen. Rows that name an entity - Course, Quiz, Lesson, Instructor - follow your custom labels, so a site that renamed Course to Class reads “Class Completed”.
Notification Sent to Enrollment Welcome Student (on enrollment) Course Completed Student (on completion) Certificate Issued Student (on certificate generation) Quiz Graded Student (when a manual-graded quiz is finalized) Quiz Submitted Student (on every quiz submission) Instructor Application Approved Instructor applicant Instructor Application Rejected Instructor applicant Instructor Application Received Instructor applicant (on submission) Withdrawal Approved Instructor (on payout approval) Withdrawal Rejected Instructor Payout Sent Instructor (when the payout leaves) Payout Failed Instructor Payout Failed (to the site owner) Admin Payment Receipt Buyer (on a completed purchase) Lesson Unlocked (drip) Student (when drip releases a lesson) New Enrollment (to the Instructor) Instructor (on every enrollment in their course) New Instructor Application (to the site owner) Admin New Payment (to the site owner) Admin (on every sale) Membership Created Member (on subscription start) Membership Cancelled Member (on cancellation) Membership Renewed Member (on renewal) Membership Expired Member (on expiry) Trial Ending Reminder Member (trial nearly over) Re-engagement Reminder Student (when their courses have gone quiet - see The re-engagement reminder) New Course Review Admin (when a student submits a review) New Lesson Comment Admin (when a comment is posted) Reply to a Comment The commenter (when a reply arrives) Three of these fire on every single event and are the ones busy sites usually turn off first: New Enrollment (to the Instructor), New Payment (to the site owner), and Quiz Submitted.
Each row also has a Customize copy link that expands a per-template editor for that notification’s subject and body. See Customizing an Email Template below.
-
Click Save Changes.
The re-engagement reminder
Section titled “The re-engagement reminder”Students who stop halfway are the largest recoverable group on any academy. The Re-engagement Reminder is the one automated email aimed at them: a short “you stopped, here is your dashboard, come back” nudge sent to a student whose enrolled, uncompleted courses have gone quiet.
Configuring it
Section titled “Configuring it”Two controls, both on LMS Settings > Emails:
| Control | Where | What it does |
|---|---|---|
| Inactive after (N) days | The Re-engagement card, above the notification list | How many days of no activity make a student count as lapsed. Any whole number from 1 to 90. The default is 14. |
| Re-engagement Reminder toggle | In the Email Notifications list | Turns the email itself on or off. Switch this off and no reminder is ever sent, whatever the threshold says. |
The threshold measures activity on a student’s active, uncompleted enrollments. It is the same measure the Students list’s inactivity filter uses, so a threshold of 14 targets exactly the people that filter shows you at “Inactive 14+ days”.
Like every other notification, this one has a Customize copy link for rewriting its subject and body.
How often a student hears from you
Section titled “How often a student hears from you”Once per lapse, not once per day. Learnomy runs the sweep daily but records when it last nudged each student and will not nudge the same person again until a further full threshold window has passed. A student who lapses, gets the reminder, and stays away is not emailed again 24 hours later.
A single run sends at most 500 reminders, so a backlog larger than that is spread across consecutive daily runs rather than going out as one flood.
The student’s own opt-out
Section titled “The student’s own opt-out”The reminder is promotional, not transactional, so students can switch it off themselves. On their account page, under Notifications, the checkbox labelled “Comments, replies, and new reviews” covers it. Unticking that box stops the re-engagement reminder along with the comment and review emails it names.
An opted-out student is skipped even when the reminder is triggered by hand. Receipts and account-security messages are never suppressible and have no checkbox.
Sending one by hand
Section titled “Sending one by hand”Instructors do not have to wait for the daily sweep. The Students at Risk card on the instructor dashboard lists their own at-risk students with a Send reminder button on each row, which sends this same email immediately. See Managing Students.
Both gates still apply to a manual send: if you have switched the Re-engagement Reminder off, or that student has opted out, nothing goes out.
Viewing the Email Log
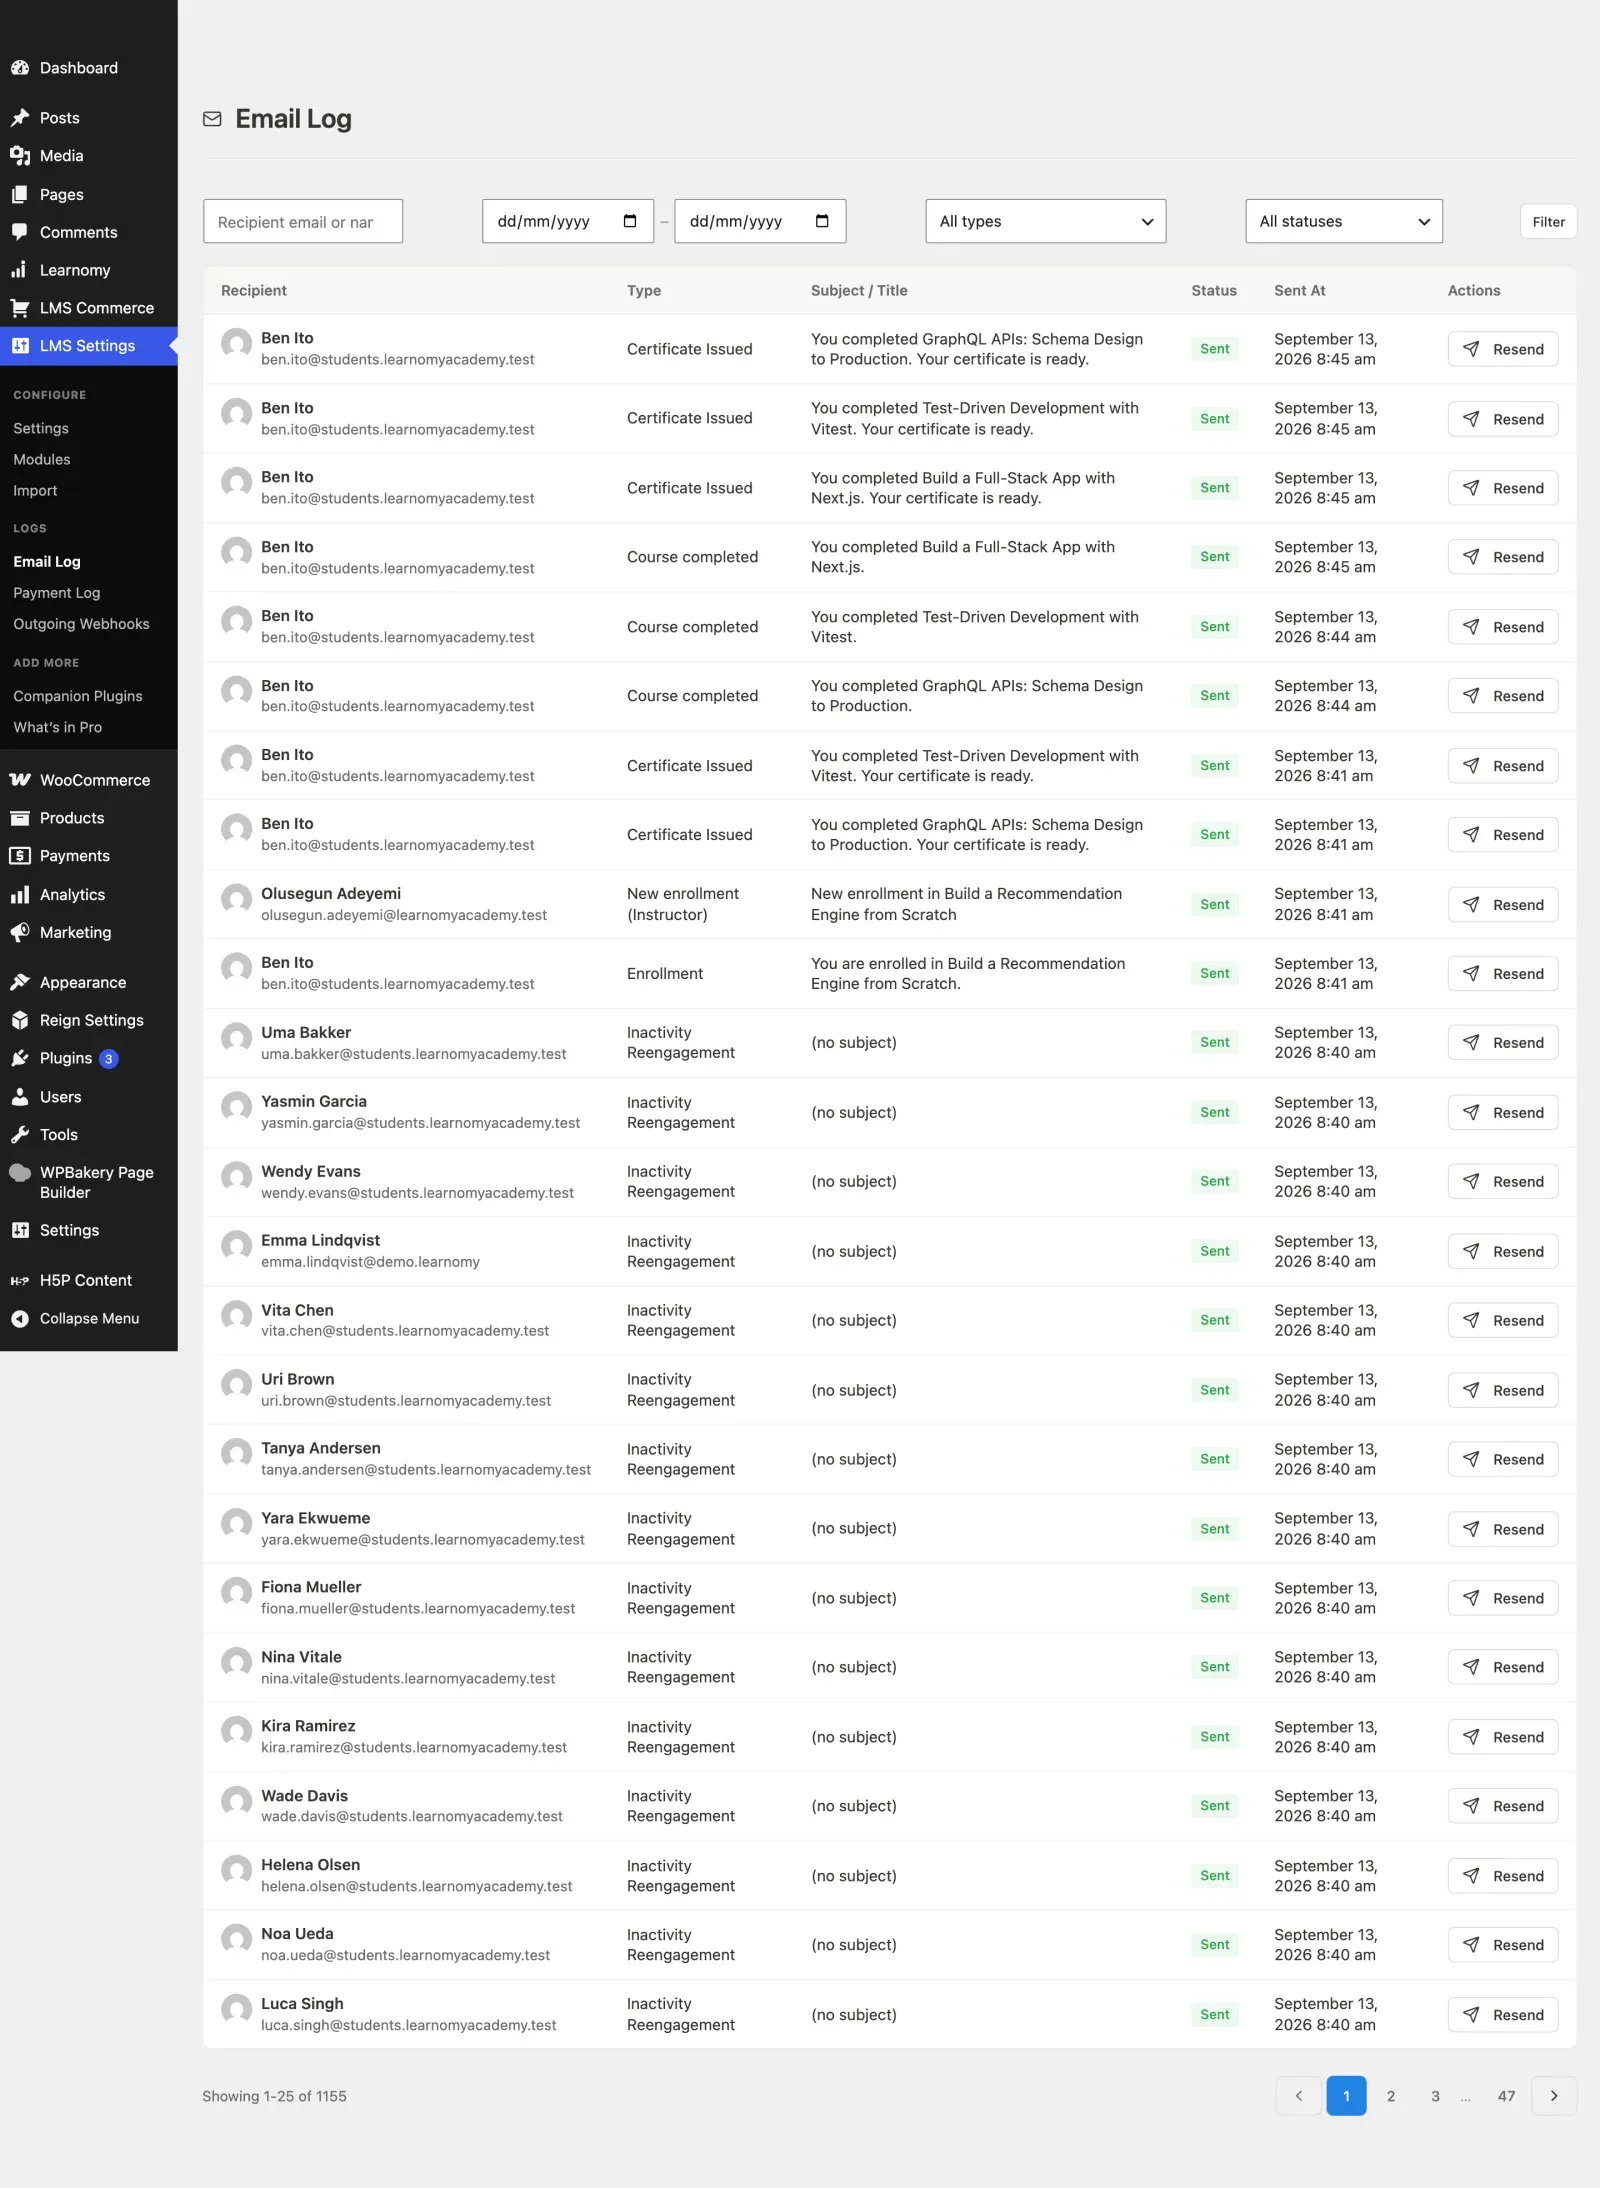
Section titled “Viewing the Email Log”The Email Log records every notification Learnomy attempted to send. It is useful for confirming a specific student received an enrollment email or for diagnosing delivery problems.
-
Go to LMS Settings in the sidebar.
-
Click Email Log under the Settings submenu.
-
The page header shows the log name.

-
Use the filter bar above the table to narrow the log by recipient (email or name), a date range, or delivery status (All statuses / Sent / Failed / Skipped). Click Filter to apply your choices, or Clear to reset.
-
The table lists every logged notification with six columns:
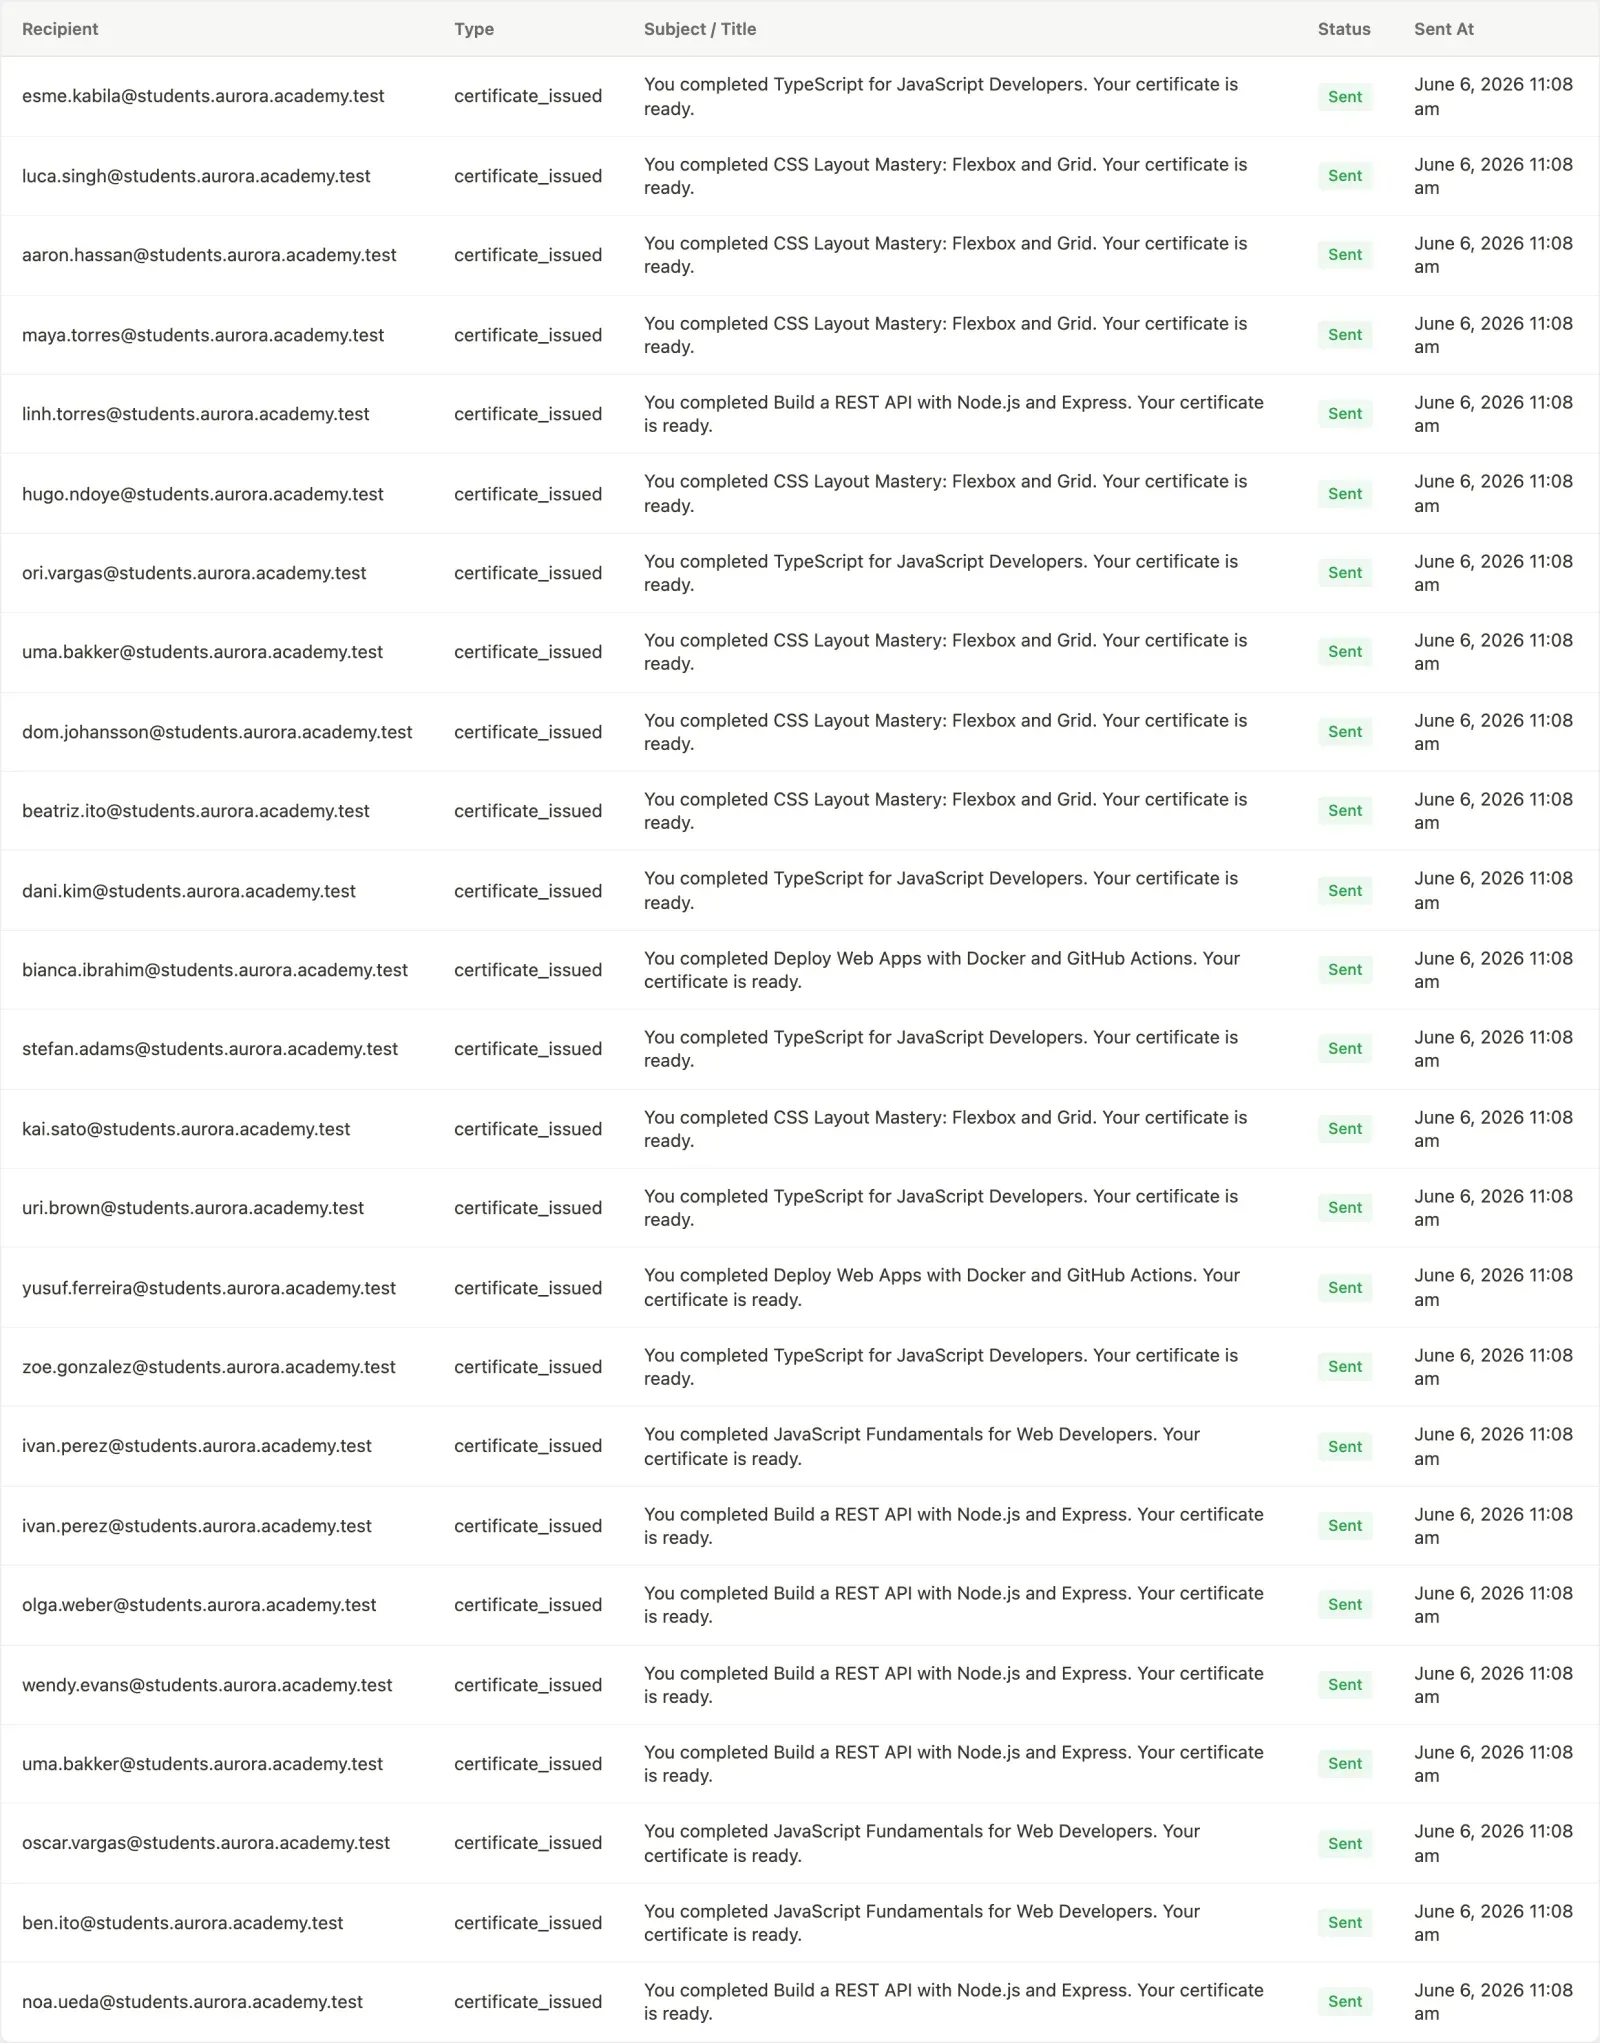
Column What it shows Recipient The recipient’s name and email address (or “User #ID (deleted)” if the account no longer exists) Type The notification type, such as Enrollment or Quiz Graded Subject / Title The notification subject line or title Status sent,failed, orskipped. A failed row also shows the failure reason underneath the status badge, when it was capturedSent At Date and time the notification was dispatched Actions Resend, shown whenever the row has a reachable recipient email Rows written before the real delivery status column existed show
skippedrather than a status that cannot be verified. A failed row logged before failure-reason capture existed shows a hint to resend the email to capture the reason going forward. -
Use the pagination controls at the bottom to move between pages. The log shows 25 entries per page.
Resending a notification
Section titled “Resending a notification”Click Resend on any row that has a recipient email to send that notification again immediately, using the same subject and body that were originally sent. Use this when a student says they never received an enrollment, certificate, or other notification email, or to retry a failed row after fixing your site’s mail delivery.
Customizing an Email Template
Section titled “Customizing an Email Template”Every automated notification’s subject and body can be customized without writing code, right from the Email Notifications table.
-
Go to LMS Settings > Emails.
-
Find the notification you want to change in the Email Notifications table.
-
Click Customize copy to expand the editor for that row.
Field What it does Subject Overrides the default subject line. Leave blank to keep the default. Body Overrides the default message body. Leave blank to keep the default. Your text is placed inside Learnomy’s branded email layout (logo, footer, unsubscribe link) automatically; you only edit the message itself. -
Personalize the copy with merge tags. These are available on every notification:
Merge tag Replaced with {student_name}The recipient’s display name {student_first_name}The recipient’s first name (falls back to display name) {student_email}The recipient’s email address {site_name}Your site name {site_url}Your site’s home URL {login_url}The login page URL Many notifications also expose event-specific tags, such as
{course_title}on a course-related email. The text above the Subject field for each row lists the tags available there. -
Click Save Changes.
A row with saved custom copy shows Custom copy instead of Customize copy, so you can tell at a glance which templates have been changed from their defaults. Clearing both the Subject and Body fields and saving restores the default template.
Sending an Announcement
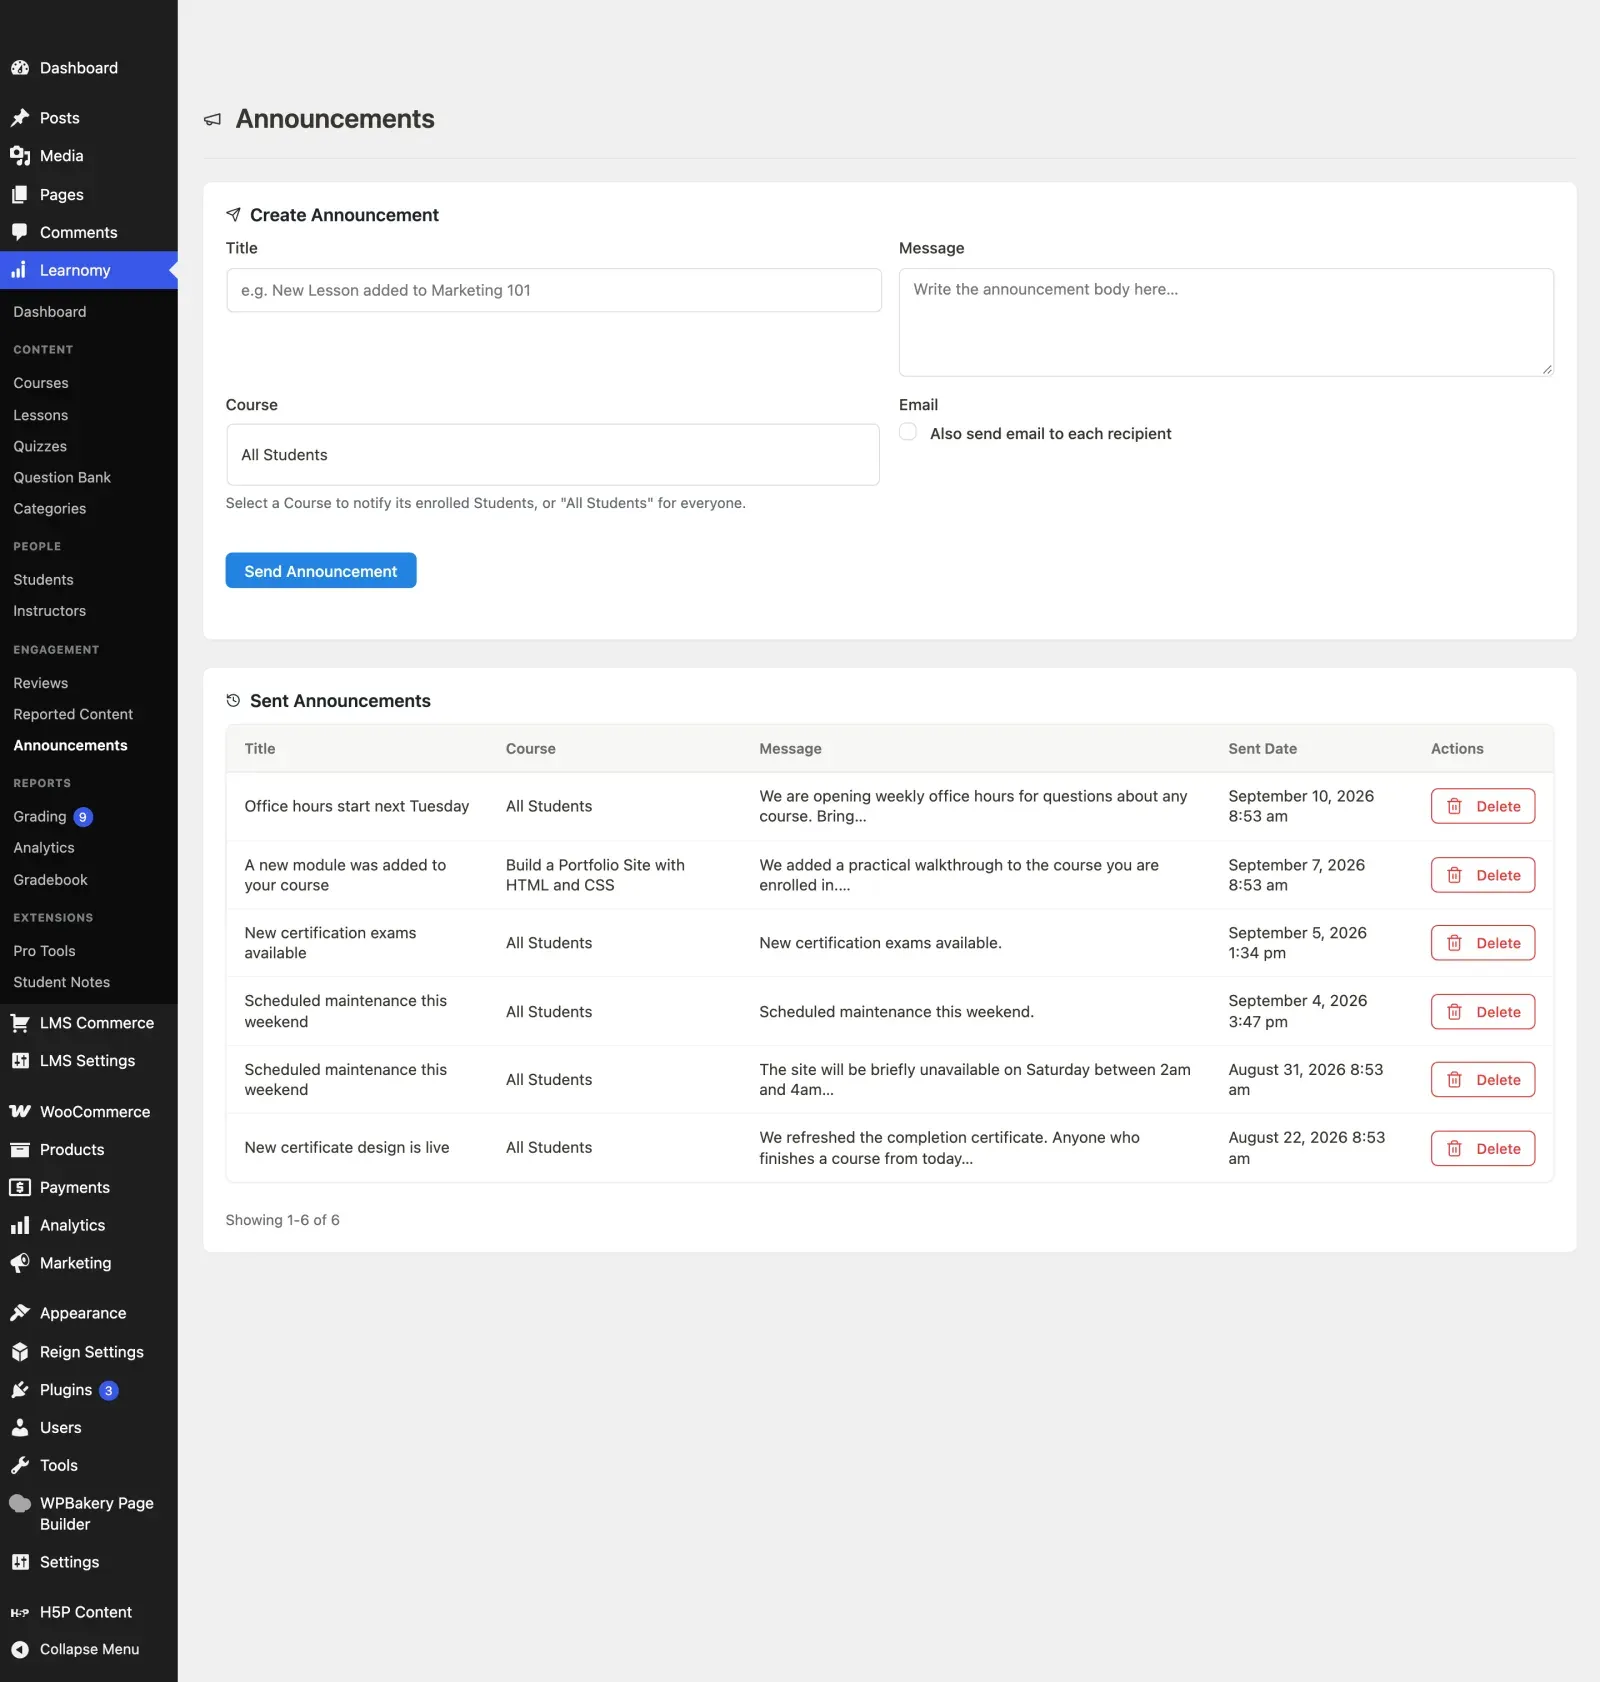
Section titled “Sending an Announcement”Announcements let you push a message to students as an in-app notification and, optionally, as an email.
-
Go to Learnomy > Announcements in the admin sidebar.
-
The page header confirms you are on the Announcements screen.

-
Fill in the Create Announcement form.
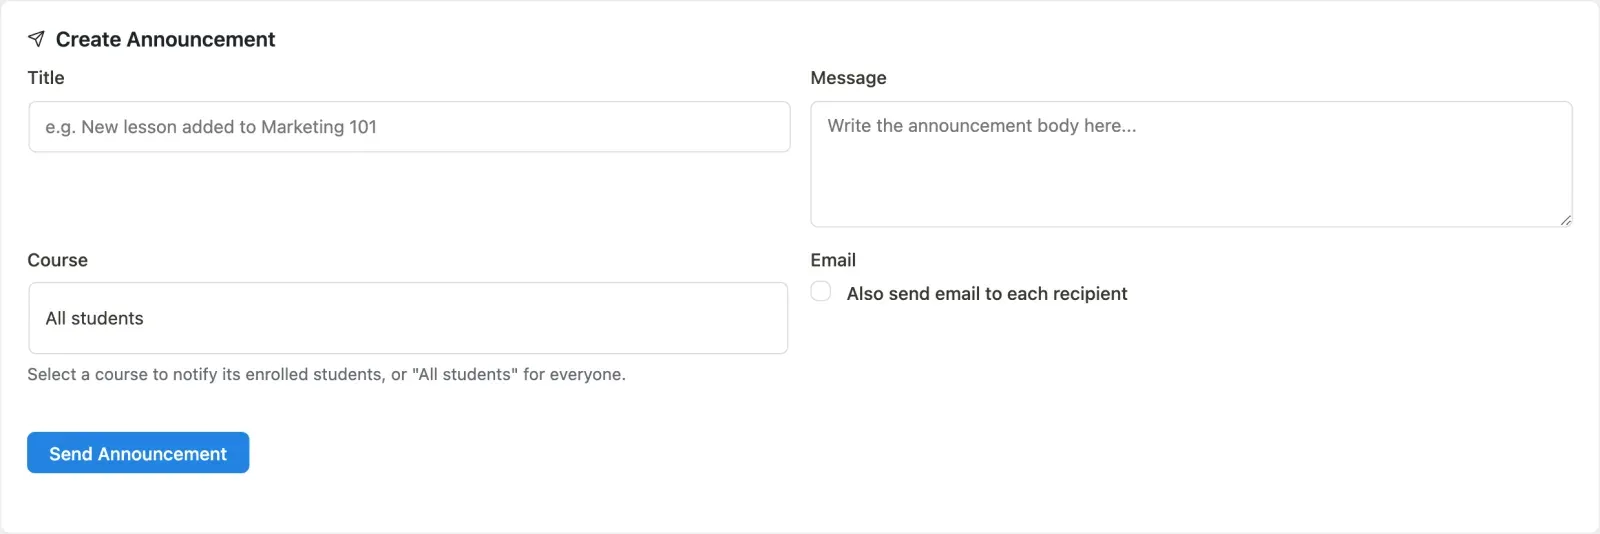
Field What to enter Title A short, clear subject line for the announcement Message The announcement body Course Select a specific course to notify only its enrolled students, or leave it as All students to reach every student on the site Email Check Also send email to each recipient if you want the announcement delivered by email as well as as an in-app notification -
Click Send Announcement. The form submits and the announcement appears in the Sent Announcements list below.
Reviewing Sent Announcements
Section titled “Reviewing Sent Announcements”The Sent Announcements list below the compose form shows every announcement that has been sent.
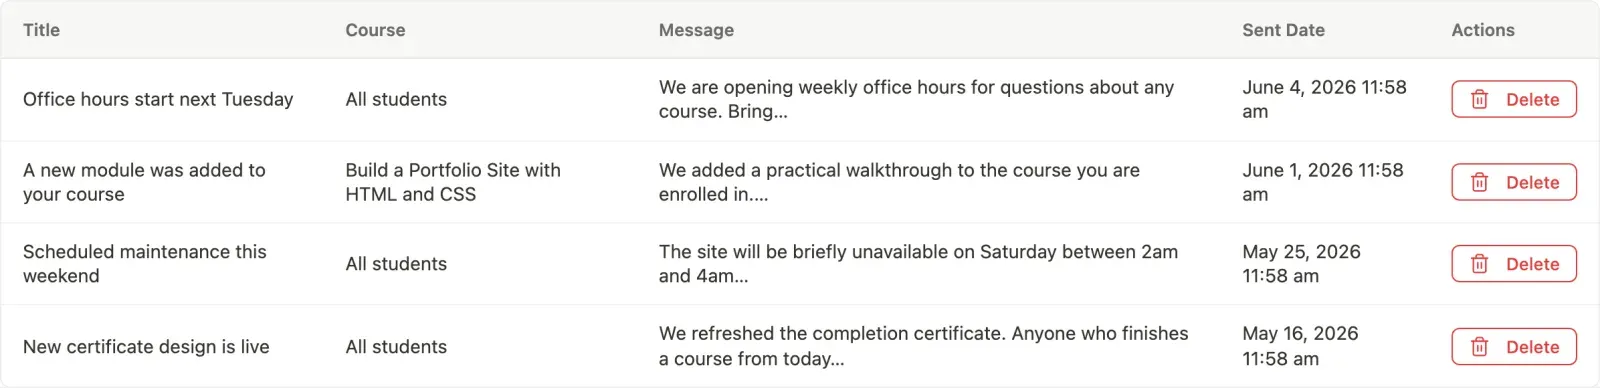
Each row shows the title, the course it was targeted to (or “All students”), a short excerpt of the message, and the date sent. You can delete a past announcement from the row actions. Deleting removes it from every recipient’s notification feed and cannot be undone.
The list is paginated at 20 entries per page.
- Turning off a notification type stops future emails of that type but does not affect notifications already sent.
- Raising the Inactive after threshold does not re-nudge anyone. It only changes who qualifies from the next daily run onward.
- The Email Log captures notifications from the moment the status column was added (migration 3.8.0). Older rows show
skippedbecause their actual delivery status was never recorded. - Resending a notification sends it again to the same recipient; it does not change or clear the original log row.
- An announcement sent to a specific course notifies only students who are currently enrolled in that course. Students who enroll later do not receive it.
- There is no way to edit a sent announcement. Delete it and create a new one if the content needs to change.
- Custom copy overrides apply the next time that notification fires. They do not retroactively change notifications already logged.
Related
Section titled “Related”Mobile push notifications
Section titled “Mobile push notifications”If your members use the Learnomy companion app, the same notifications can arrive as push messages on their phone.
| Field | Option key | Default |
|---|---|---|
| Send notifications to registered mobile devices | push_enabled |
Off |
| Firebase service account | push_fcm_service_account |
empty |
Send notifications to registered mobile devices is the master switch. With it off, no push is sent no matter what else is configured.
Firebase service account takes the JSON credential Firebase gives you, pasted whole into the field. To get it: open the Firebase console, pick the project your app is registered against, go to Project settings > Service accounts, click Generate new private key, and paste the contents of the downloaded .json file. It is a credential, so treat it like a password.
Push to Expo-built apps works without Firebase. Firebase is only needed for the native Android and iOS builds.